
Key Takeaways
- Accessible shower planning should support balance, comfort, and independence.
- Low-entry access, secure support features, seating, and slip-resistant flooring deserve early attention.
- The layout should work for current routines while allowing for changing needs.
- Safety features can coordinate with a modern bathroom design.
- A detailed plan helps prevent costly changes after construction begins.
A safer shower can make everyday routines more comfortable for people of many ages and mobility levels. Whether you are remodeling for an older relative, recovering from an injury, or planning to stay in your home long term, the right layout can reduce awkward movements and make bathing feel more manageable.
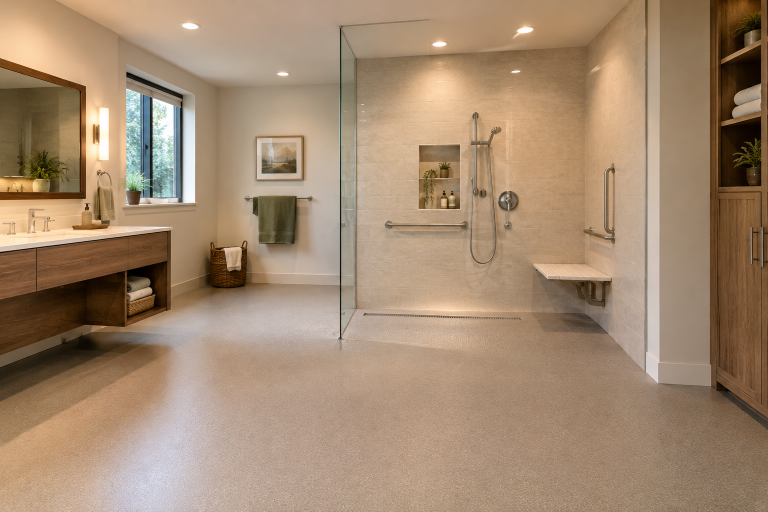
Options such as easy-access walk-in showers can help homeowners create a lower-barrier bathing area, but the best solution depends on the user, the room, and the amount of support needed. Start with daily habits, then build the design around safe entry, stable footing, reachable controls, and enough open space.
Why Accessible Shower Design Matters
Showers can be challenging when they combine a high threshold, wet flooring, dim lighting, and controls that require stretching. Thoughtful design reduces those friction points. Current bathroom planning also places greater emphasis on larger showers, integrated seating, better lighting, storage, and aging-in-place features, as reflected in bathroom trends that focus on individual lifestyles.
Start With the User’s Needs
Before choosing tile, glass, or fixtures, consider who will use the shower and how. Ask whether standing for a full shower is difficult, whether someone uses a cane, walker, wheelchair, or shower chair, and whether a caregiver may need space to assist. Also consider whether a handheld shower, seated bathing position, or added wall support would make the routine easier. Planning for likely needs over the next five to ten years can prevent the need for another major remodel later.
Choose the Right Entry
A traditional curb can help contain water, but it also creates a step. Low-threshold and level-entry showers reduce that obstacle and can be easier to navigate for mobility device users. The tradeoff is that drainage, waterproofing, and floor slope need careful coordination from the beginning.
Leave Room to Move
Consider the clear space outside the shower, the width of the opening, and whether a door could block movement. A layout should allow the user to enter, turn, and exit without having to squeeze past a vanity or toilet. Confirm permit and building requirements with your local authority before work starts.
Add Support Without Clutter
Support features work best when they are located where a person naturally needs them, such as near the entry and beside the primary bathing position. Grab bars must be attached to properly reinforced framing or an approved mounting system, not simply fastened through decorative wall material. Textured flooring, easy-to-grip controls, and color contrast between surfaces can further improve confidence without making the room feel clinical.
Plan for Seating and Reach
Built-in benches provide a permanent place to sit, fold-down seats preserve floor space, and movable shower chairs offer flexibility. Whichever option you choose, leave enough transfer space and make sure water can drain away from the seating area. Place niches, shelves, and soap holders within easy reach from both standing and seated positions. A handheld shower with a flexible hose is especially useful when seated bathing is part of the plan.
Improve Lighting and Visibility
Even lighting helps users see changes in floor level, controls, and stored items. Use fixtures rated for bathroom conditions, limit dark corners, and avoid highly reflective finishes that create glare. A small night light or low-level pathway light can also make nighttime trips to the bathroom easier. Contrast between the shower floor, walls, and hardware makes important edges easier to identify.
Balance Safety and Style
Practical details do not have to dominate the room. Grab bars are available in finishes that can match faucets and cabinet hardware. Recessed storage keeps bottles off the floor, while warm colors, natural-looking textures, and simple wall finishes can make the shower feel welcoming. Glass panels may suit some layouts, but privacy, cleaning needs, water control, and user stability should guide that decision.
Budget for the Full Project
Look beyond the visible finishes when setting a budget. Costs may include plumbing changes, drain relocation, floor repairs, waterproofing, electrical work, lighting, seating, storage, permits, and labor. The ADA Standards apply to covered public and commercial settings, but they can still offer useful reference points when discussing accessible clearances and features with a qualified professional. Ask for a written estimate that separates essential work from optional upgrades.
Common Planning Mistakes
- Installing a grab bar without adequate wall reinforcement.
- Choosing seating that is too small or poorly placed for safe movement.
- Locating controls deep inside the wet area.
- Forgetting room for a caregiver, walker, or shower chair.
- Selecting a smooth floor material that becomes slippery when wet.
- Leaving everyday bottles and supplies at floor level.
- Choosing finishes before solving entry, drainage, and access concerns.
Final Checklist
- Can the user enter and exit with minimal stepping and turning?
- Are support points secure and placed where they will be used?
- Can controls and toiletries be reached safely?
- Is there room for seating, a mobility device, or assistance?
- Does the floor provide dependable traction when wet?
- Are lighting and visual contrast strong enough for clear visibility?
- Have drainage, waterproofing, permits, and local requirements been reviewed?
Conclusion
A safer shower does not have to be the biggest or most expensive one. The most effective design is the one that fits real routines, supports changing needs, and helps every user feel more secure each day.